From Inquiry to Delivery: The Complete Order Journey
Follow an order from first customer contact through inquiry, quoting, production, delivery, and payment — the full lifecycle in BakeOnyx.
From Inquiry to Delivery: The Complete Order Journey
- Understand the entire lifecycle of a customer order in BakeOnyx, from initial contact to final payment.
- Learn how to manage inquiries, create quotes, and convert them into confirmed orders.
- See how BakeOnyx automates key steps and tracks your order from production to delivery and reporting.
BakeOnyx helps you manage every step of the order process, ensuring that no detail is missed and your customers have a smooth experience. This guide walks you through the typical journey of an order, from the moment a customer expresses interest to when they receive their delicious baked goods and make their payment.
The Full Order Pipeline
The order journey can start in a few ways, but for custom orders and new clients, the full pipeline is key:
Step 1: Receiving an Inquiry
A customer reaches out to your bakery via phone, email, or your website's contact form. To capture this interest, navigate to Dashboard > Inquiries and click the New Inquiry button.
BakeOnyx will automatically assign a unique reference number (e.g., INQ-001). You'll then fill in essential details:
- Customer's name and contact information
- Event date and type
- Details about the products they're interested in
- Their budget (if known)
- Any special notes or requests
Step 2: Reviewing and Assigning
Once the inquiry is created, you can assign it to a specific staff member and set a Follow-up Date. The inquiry status will automatically update from New to Reviewing.
Step 3: Communicating with the Customer
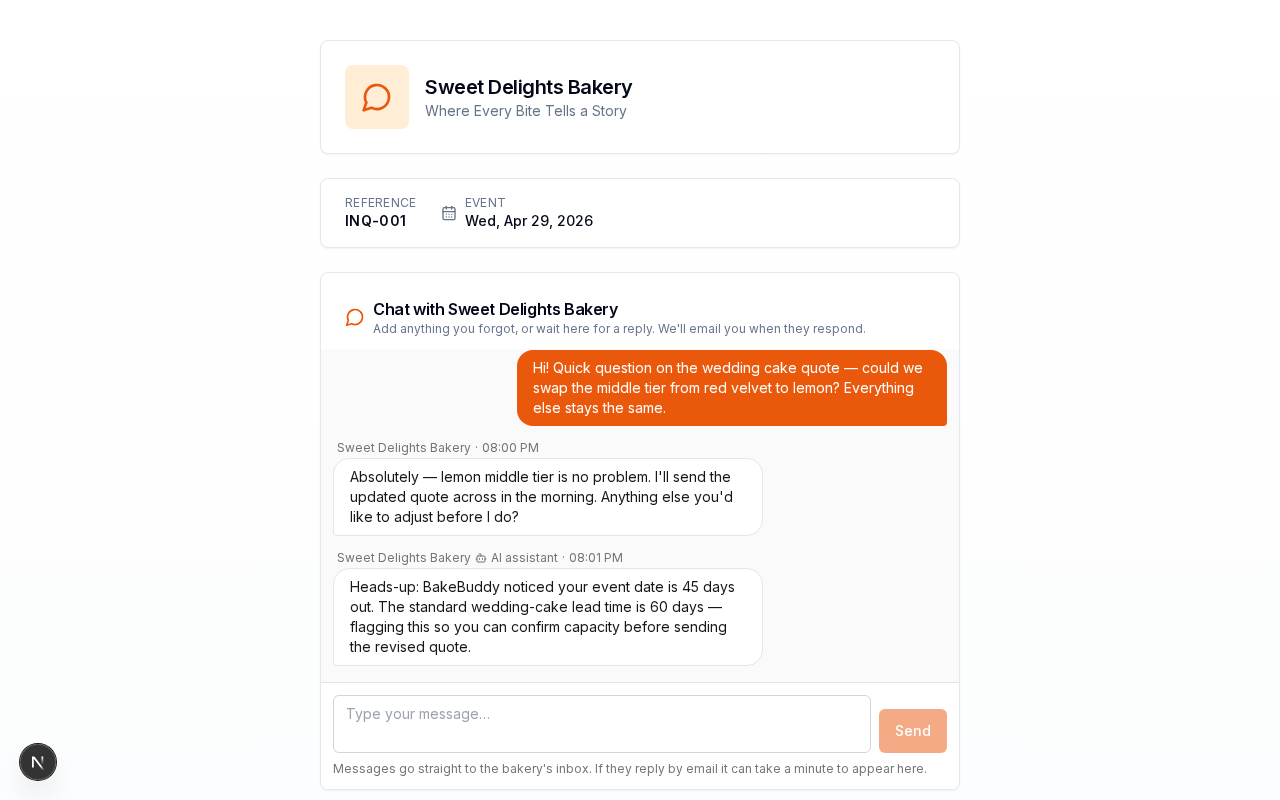
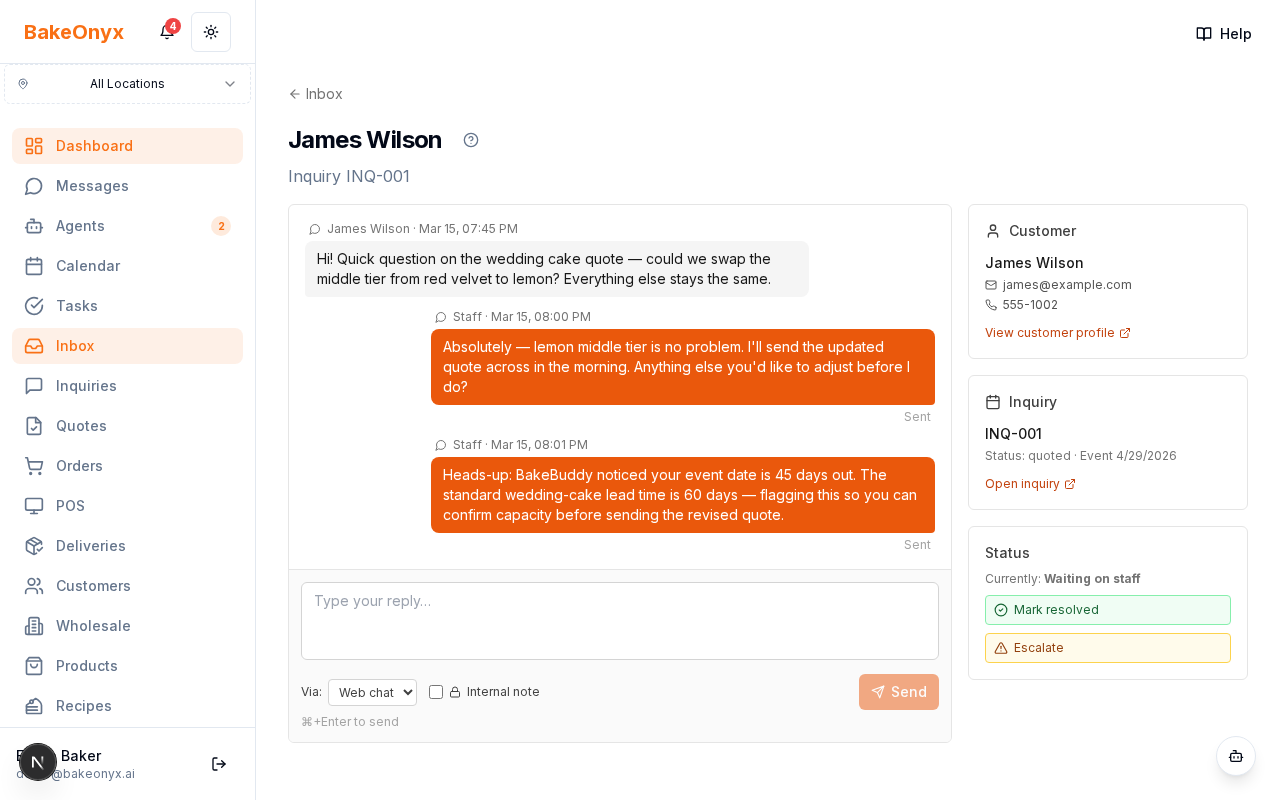
Respond to the customer with clarifications, options, or initial thoughts. As you communicate, the inquiry status will move to Responded. BakeOnyx makes this easy with a private chat link for each inquiry. This link, found at /i/[token], can be shared with the customer via email. They can reply directly from any device without needing to log in, and their messages will appear instantly in your BakeOnyx Inbox.
Step 4: Creating a Quote
When you're ready to provide pricing, create a quote directly from the inquiry. This generates a quote reference number (e.g., QT-001). The quote will include detailed line items with quantities, descriptions, and unit prices. The quote status begins as Draft.
Step 5: Sending the Quote
Send the finalized quote to your customer. The quote status will update to Sent.
Step 6: Customer Acceptance and Order Creation
Once the customer accepts your quote, click the Convert to Order button directly on the quote. BakeOnyx automatically creates a new order, transferring all line items, linking the customer record, and setting the initial order status to Pending. The associated inquiry status will update to Converted.
Step 7: Confirming the Order
Review the newly created order and confirm it. The order status will change to Confirmed.
Step 8: Production Planning
On the day production begins, your order items will automatically feed into the AI production scheduler located at Dashboard > Production.
Step 9: Production and Inventory
As your team completes production tasks, ensure you confirm inventory deductions within BakeOnyx.
Step 10: Preparing for Delivery or Pickup
Once production is complete, the order status will update to Ready for customer pickup. If your bakery handles delivery, you can set the status to Out for Delivery.
Step 11: Delivery Confirmation
After the order has been successfully handed over to the customer, update the status to Delivered.
Step 12: Payment Tracking
BakeOnyx allows you to easily track payments against each order. Record full or partial payments and manage different payment methods.
Step 13: Financial Reporting
Completed orders, along with their associated revenue and cost data, automatically flow into your financial reports at Dashboard > Reports, providing valuable insights into your bakery's performance.
Status Transitions at a Glance
Understanding status changes helps you keep track of where each order is:
- Inquiry Statuses:
New→Reviewing→Responded→Quoted→Accepted→Converted - Quote Statuses:
Draft→Sent→Accepted(orRejected) - Order Statuses:
Pending→Confirmed→In Progress→Ready→Out for Delivery→Delivered(orCancelledat any stage)
What BakeOnyx Automates
- Generation of unique inquiry and quote reference numbers.
- Automatic calculations for quote totals.
- Creation of new orders from accepted quotes, including all line items and customer details.
- Linking of customer records (and creation of new ones if needed).
- Cost tracking when recipes are linked to order items.
- Timestamping of status changes for a clear audit trail.
Next Steps
Now that you understand the order journey, explore how to manage your supplies:
The summary, FAQ, and statistics in this section were compiled from public sources and reviewed by the BakeOnyx editorial team. AI-assisted research.
Frequently Asked Questions
How does BakeOnyx handle customer inquiries from different sources?▾
BakeOnyx centralizes inquiries from various channels, including a public inquiry form embeddable on your website, direct input for phone/email/walk-in customers, and social media messages. The system dynamically adjusts form fields based on the product type, ensuring all necessary details like size, shape, and customization options are captured efficiently.
Can I send a quote before converting an inquiry to an order in BakeOnyx?▾
Yes, BakeOnyx allows for an optional quoting step. You can easily create a quote directly from an inquiry, adding line items and referencing images. The customer receives a link to accept or decline the quote via email. If they accept, you can then manually convert it to an order or set up auto-conversion.
What are the different ways to convert an inquiry into an order using BakeOnyx?▾
BakeOnyx offers three conversion methods. An inquiry can auto-convert to an order when a customer accepts a quote if this setting is enabled. Alternatively, you can manually convert an accepted quote to an order. For businesses that skip quoting, direct conversion from the inquiry to an order is also supported, mapping all data automatically.
How does BakeOnyx assist with order fulfillment and production?▾
Once an order is created in BakeOnyx, it appears on your Orders list and Calendar. You can confirm the order, set production dates, and create specific tasks for your team, such as baking and decorating. The system allows for status updates to track progress through the production schedule effectively.
What payment and delivery features are included in the BakeOnyx order process?▾
BakeOnyx simplifies invoicing and payment by allowing you to generate invoices directly from orders. Customers can pay online via integrated Stripe or Square, or you can record manual payments. The system also handles delivery notifications, marking orders as ready for pickup or out for delivery, and retains delivery address information.