Setting Up Delivery Zones
Create delivery zones with postal codes, fees, and time slots for organized delivery management.
Setting Up Delivery Zones
Delivery zones help you organize where you deliver, set fair delivery fees, and manage your delivery capacity. In this guide, you'll learn how to create and configure zones for your bakery.

What you'll learn
- How to create a new delivery zone with postal codes and fees
- How to set up delivery time slots for each day of the week
- How to manage multiple zones and control delivery capacity
Creating Your First Delivery Zone
Start by navigating to your delivery zones page and creating a zone that matches your service area.
- From your BakeOnyx dashboard, click Delivery in the left menu.
- Select Zones from the submenu.
- Click the + New Zone button in the top right.
Fill in zone details
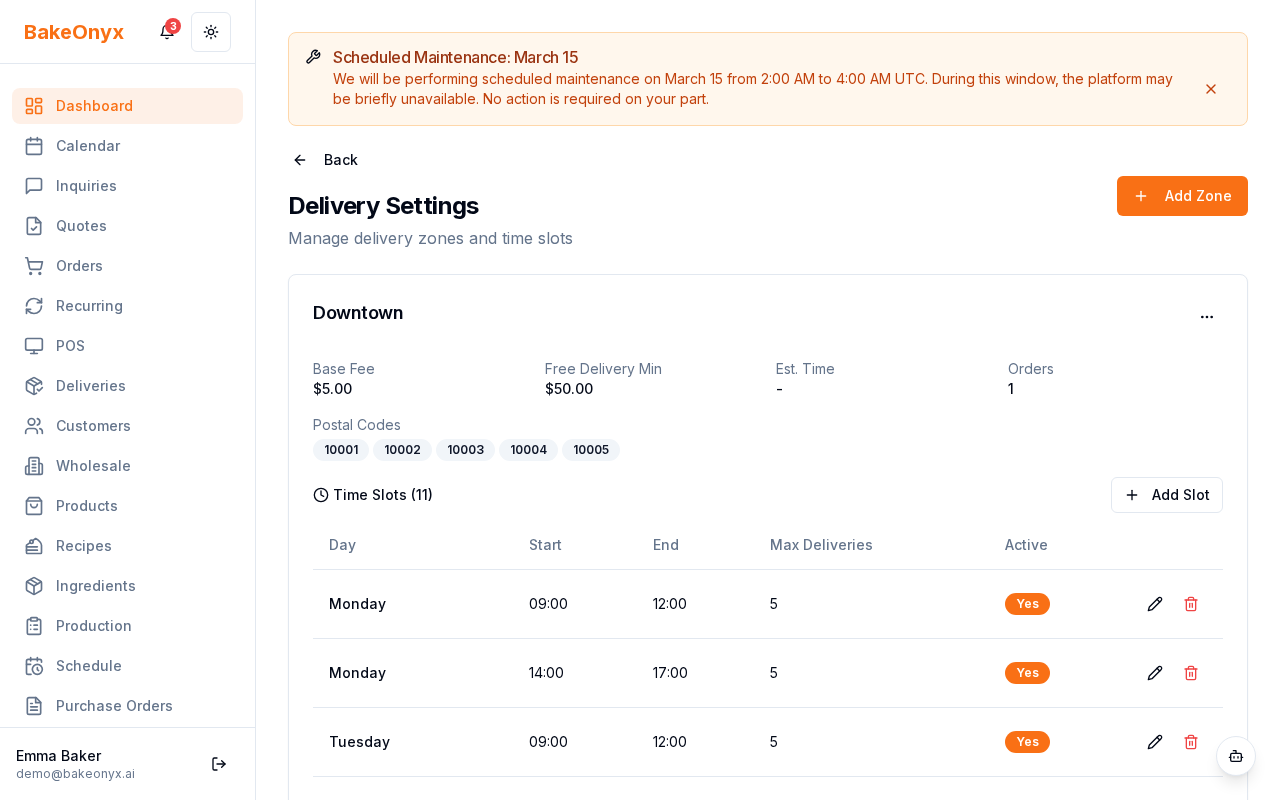
- Zone Name: Enter a name customers will recognize, like "Downtown," "Suburbs," or "North Side." This appears in your online store at checkout.
- Postal Codes: Add all postal codes this zone covers. Click + Add Postal Code and enter each code. You can add as many as needed for your service area.
- Base Delivery Fee: Set the flat fee you charge for deliveries in this zone (e.g., $5.00).
- Free Delivery Minimum: Enter the order total that qualifies for free delivery. For example, if you set this to $50, orders of $50 or more get free delivery in this zone.
- Status: Toggle Active to enable this zone immediately, or leave it off to set it up now and activate it later.
- Sort Order: Enter a number to control how zones appear in your online store (1 appears first, 2 second, etc.).
Setting Up Delivery Time Slots
Time slots define when customers can request delivery in each zone. You can set different hours for weekdays, weekends, or specific days.
- Scroll down to the Delivery Time Slots section.
- Click + Add Time Slot.
- Select the Day of Week (Monday, Tuesday, etc.).
- Set the Start Time and End Time for deliveries. For example, 9:00 AM to 12:00 PM.
- Enter the Max Deliveries per Slot — this limits how many orders you can deliver during that window. If you have one delivery driver, you might set this to 5–8 deliveries per slot.
- Click + Add Time Slot again to add another window on the same day (e.g., 2:00 PM to 5:00 PM).
- Repeat for each day of the week you deliver.

Saving and Managing Your Zones
- Click Save Zone at the bottom of the form.
- Your zone now appears in the zones list. You can edit or delete it anytime by clicking the zone name.
- Reorder zones by dragging them in the list, or update the sort order number in each zone's settings.
Best Practices
- Match your capacity: Set max deliveries per slot based on your actual delivery resources. Overestimating leads to late deliveries and unhappy customers.
- Offer flexibility: Create multiple time slots per day so customers have options.
- Test before going live: Set zones to inactive while you test, then activate when ready.
- Review and adjust: After a few weeks, check if your slots fill up. If they do, add more slots or increase max deliveries.
Next steps
- Managing Daily Deliveries — Learn how to view and fulfill orders on your delivery board.
- Creating a New Order — Manually create orders with delivery options.
- Setting Up Your Online Store — Ensure your zones display correctly to customers.
The summary, FAQ, and statistics in this section were compiled from public sources and reviewed by the BakeOnyx editorial team. AI-assisted research.
Frequently Asked Questions
How do I create a new delivery zone in BakeOnyx?▾
To create a new delivery zone in BakeOnyx, navigate to the 'Delivery' section from your dashboard and select 'Zones.' Click the '+ New Zone' button. You'll then fill in the zone name, add relevant postal codes, set a base delivery fee, and specify a free delivery minimum order total. You can also set the zone's status to active and define its sort order.
What are delivery time slots and how do I set them up?▾
Delivery time slots in BakeOnyx define the available windows for customers to receive deliveries within a specific zone. To set them up, scroll to the 'Delivery Time Slots' section within a zone's configuration. Click '+ Add Time Slot,' select the day of the week, and define the start and end times. You can also set a maximum number of deliveries for each slot to manage your capacity effectively.
Can I set different delivery fees for different areas?▾
Yes, BakeOnyx allows you to set different delivery fees for different areas by creating distinct delivery zones. Each zone can have its own base delivery fee and a specific minimum order total required for free delivery. This flexibility helps in managing costs and offering competitive pricing across various service areas.
How can I manage my delivery capacity using BakeOnyx?▾
You can manage your delivery capacity within BakeOnyx by setting a 'Max Deliveries per Slot' for each defined delivery time slot. This feature helps prevent overbooking during peak hours or when driver availability is limited. By setting realistic limits, you ensure smoother operations and better customer satisfaction.
What is the 'Sort Order' setting for delivery zones?▾
The 'Sort Order' setting in BakeOnyx determines the sequence in which your delivery zones appear to customers during checkout on your online store. Entering a number (e.g., 1, 2, 3) dictates the order, with lower numbers appearing first. This helps you present your most relevant or frequently used zones prominently.