Creating and Managing Promo Codes
Create discount codes with percentage or fixed-amount discounts, usage limits, and date ranges.
Creating and Managing Promo Codes
- Create discount codes with percentage or fixed-amount discounts
- Set usage limits, date ranges, and minimum order amounts
- Target specific products or categories with your promotions
Promo codes are a powerful way to drive sales, reward loyal customers, and run seasonal promotions. In BakeOnyx, you can create flexible discount codes that automatically apply discounts at checkout. This guide walks you through creating and managing promo codes for your online store.
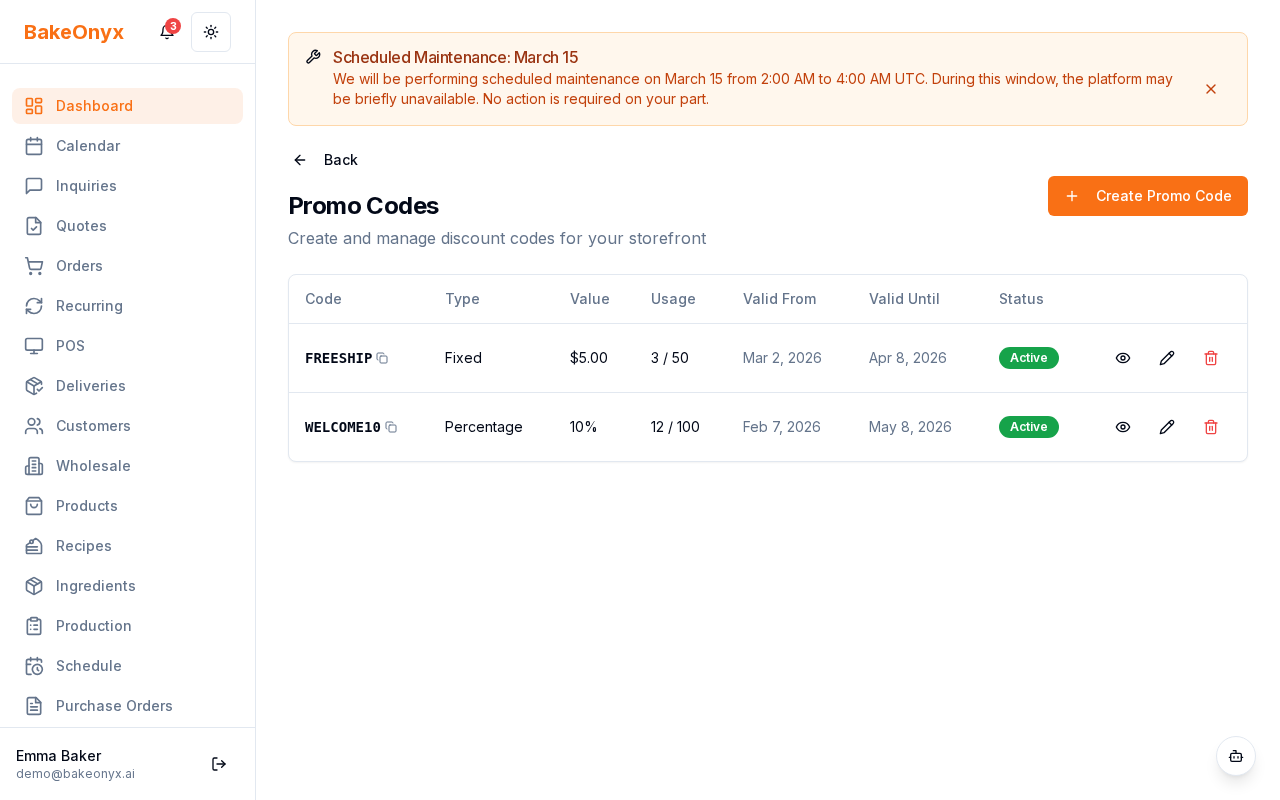
Accessing Your Promo Codes
- Log in to your BakeOnyx dashboard
- Navigate to Storefront in the left menu
- Click Promo Codes
You'll see a list of all your existing promo codes with their status, discount amount, and usage statistics.

Creating a New Promo Code
- Click the Create Promo Code button
- Enter a Code — this is what customers will type at checkout (e.g.,
SUMMER20orLOYALTY10). Make it memorable and easy to type - Choose your Discount Type:
- Percentage — discount a percentage off the order (e.g., 15% off)
- Fixed Amount — discount a set dollar amount (e.g., $5 off)
- Enter the Discount Value — the percentage or dollar amount
- Set a Minimum Order Amount (optional) — customers must spend at least this much for the code to apply
- Set a Maximum Discount Cap (optional) — limits the total discount, useful for percentage discounts on large orders
Setting Usage Limits and Dates
- Enter a Usage Limit (optional) — the maximum number of times the code can be used across all customers
- Enter a Per-Customer Limit (optional) — how many times one customer can use the code
- Set a Start Date — when the code becomes active
- Set an End Date — when the code expires
Targeting Specific Products or Categories
You can limit a promo code to specific products or product categories, or leave it open for all items:
- Under Applies To, choose whether the code applies to:
- All Products — the discount works on any item in your store
- Specific Categories — select which product categories qualify (e.g., "Cupcakes" or "Custom Cakes")
- Specific Products — choose individual products that qualify for the discount
- If targeting categories or products, select them from the dropdown list
Activating Your Promo Code
- Toggle the Active switch to On to make the code live
- Click Save
Your promo code is now live and customers can use it at checkout. The discount will calculate automatically based on their order.
Managing Existing Promo Codes
From the promo codes list, you can:
- View usage — see how many times a code has been used
- Edit a code — click the code name to modify discount amounts, dates, or limits
- Deactivate a code — toggle the Active switch off to pause a code without deleting it
- Delete a code — permanently remove a code (this cannot be undone)
Best Practices for Promo Codes
- Use clear, branded code names customers will remember
- Set end dates for seasonal or limited-time promotions to create urgency
- Monitor usage counts to track promotion performance
- Test codes yourself at checkout before promoting them to customers
- Pair promo codes with email campaigns or social media announcements for maximum impact
Next Steps
- Store Themes and Analytics — track how your promotions impact sales
- Creating a New Order — manually apply promo codes to orders in your dashboard
- Managing Customers — segment customers for targeted promotions
The summary, FAQ, and statistics in this section were compiled from public sources and reviewed by the BakeOnyx editorial team. AI-assisted research.
Frequently Asked Questions
How do I create a new promo code in BakeOnyx?▾
To create a new promo code in BakeOnyx, navigate to the 'Promo Codes' section under 'Storefront' in your dashboard. Click the 'Create Promo Code' button. You'll then enter a unique code name, choose the discount type (percentage or fixed amount) and value, and set optional parameters like minimum order amounts, usage limits, and date ranges.
Can I limit promo codes to specific items or categories?▾
Yes, BakeOnyx allows you to target your promotions precisely. Under the 'Applies To' section when creating a promo code, you can choose to apply the discount to 'All Products,' 'Specific Categories,' or 'Specific Products.' This ensures your discounts are used strategically on desired inventory.
What are the different types of discounts I can offer with BakeOnyx promo codes?▾
BakeOnyx supports two primary discount types for promo codes: 'Percentage' discounts, where a certain percentage is deducted from the order total (e.g., 15% off), and 'Fixed Amount' discounts, where a set dollar value is subtracted (e.g., $5 off). You can also set a maximum discount cap for percentage-based offers.
How do I set expiration dates and usage limits for my promo codes?▾
When creating a promo code in BakeOnyx, you can define a 'Start Date' and an 'End Date' to control its active period. Additionally, you can set a total 'Usage Limit' for how many times the code can be redeemed across all customers, and a 'Per-Customer Limit' to restrict individual usage.
Can I make a promo code that never expires or has unlimited uses?▾
Yes, you can create promo codes with unlimited usage and no expiration. To do this, simply leave the 'Usage Limit' field blank and do not set an 'End Date' when configuring your promo code in BakeOnyx. This is ideal for ongoing loyalty or referral programs.