Creating Purchase Orders
Create purchase orders for your suppliers with line items, quantities, and costs.

Creating Purchase Orders
- How to create a new purchase order for your suppliers
- How to add line items with ingredients, quantities, and costs
- How purchase order numbers are automatically generated and tracked
Overview
Purchase orders (POs) are your formal requests to suppliers for ingredients and supplies. In BakeOnyx, you can create, manage, and track POs all in one place. Each PO automatically gets a unique number, and you can add as many line items as you need. Your supplier details—like payment terms and lead time—are pulled directly from your supplier profile, so everything stays consistent.
Step-by-step: Creating a Purchase Order
Step 1: Navigate to Purchase Orders
- Log in to BakeOnyx and go to your dashboard.
- Click Purchase Orders in the left menu.
- Click the Create New PO button (top right).
Step 2: Select Your Supplier
- On the purchase order form, find the Supplier field.
- Click the dropdown and select the supplier you're ordering from.
- BakeOnyx will automatically fill in:
- Supplier name and contact details
- Payment terms (e.g., Net 30)
- Lead time (how long delivery usually takes)
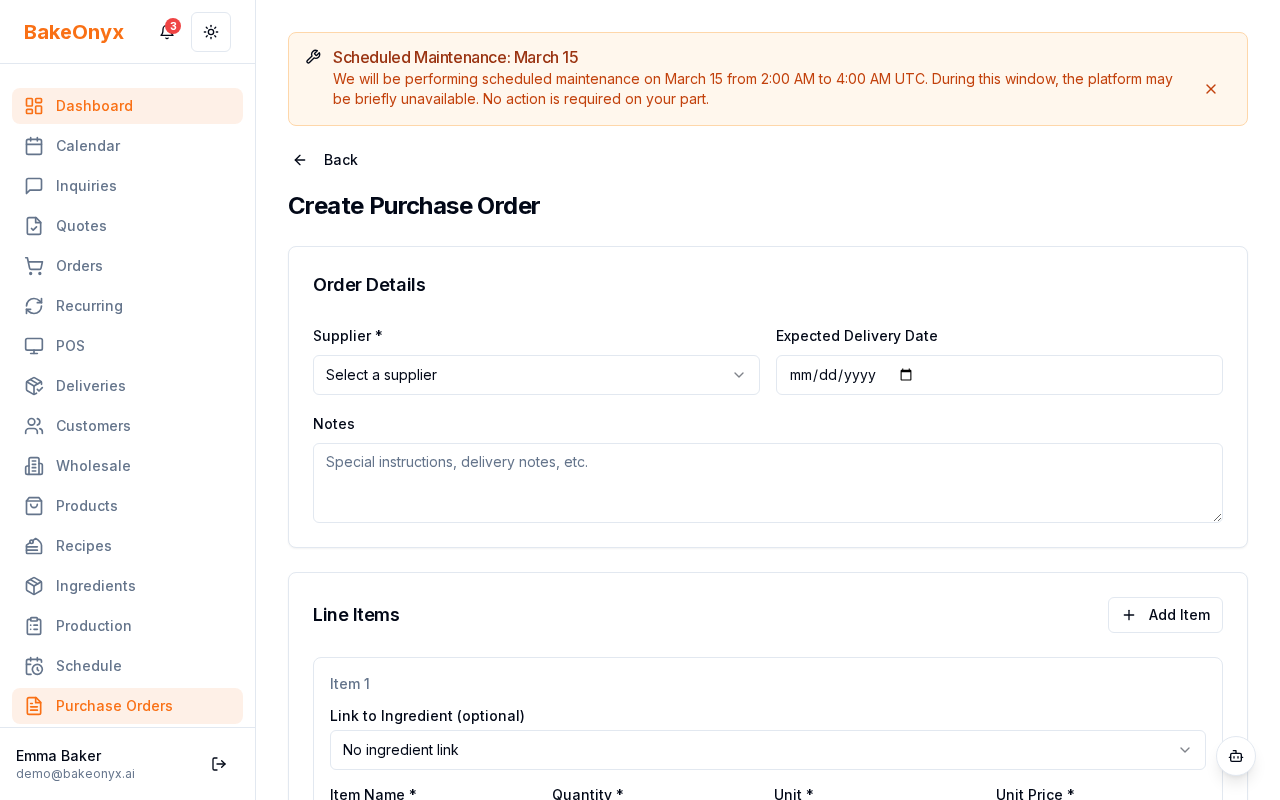
Step 3: Add Line Items
- Scroll down to the Line Items section.
- Click Add Item to add your first ingredient or supply.
- Fill in each field:
- Ingredient: Select from your ingredient list (or add a new one)
- Quantity: How many units you're ordering
- Unit: The measurement type (e.g., lbs, kg, cases, boxes)
- Unit Price: The cost per unit
- The Line Total will calculate automatically (quantity × unit price).
- Repeat to add more items. Click Add Item again for each one.
Step 4: Review Totals and Costs
- Scroll to the bottom of the form to see the cost summary:
- Subtotal: Sum of all line items
- Shipping: Add shipping costs if applicable
- Tax: Automatically calculated based on your settings
- Total: Your final PO amount
- If you need to add shipping or adjust tax, click the fields to edit them.
Step 5: Save Your Draft
- Click Save as Draft at the bottom of the form.
- Your PO will be saved with a unique number in the format
PO-YYMMDD-NNN(for example,PO-250115-001). - The PO status will show as Draft.
Step 6: Send Your PO (Optional)
- When you're ready, click Send to Supplier.
- The PO status will change to Sent.
- Your supplier will receive the order (via email or your supplier portal, depending on your setup).
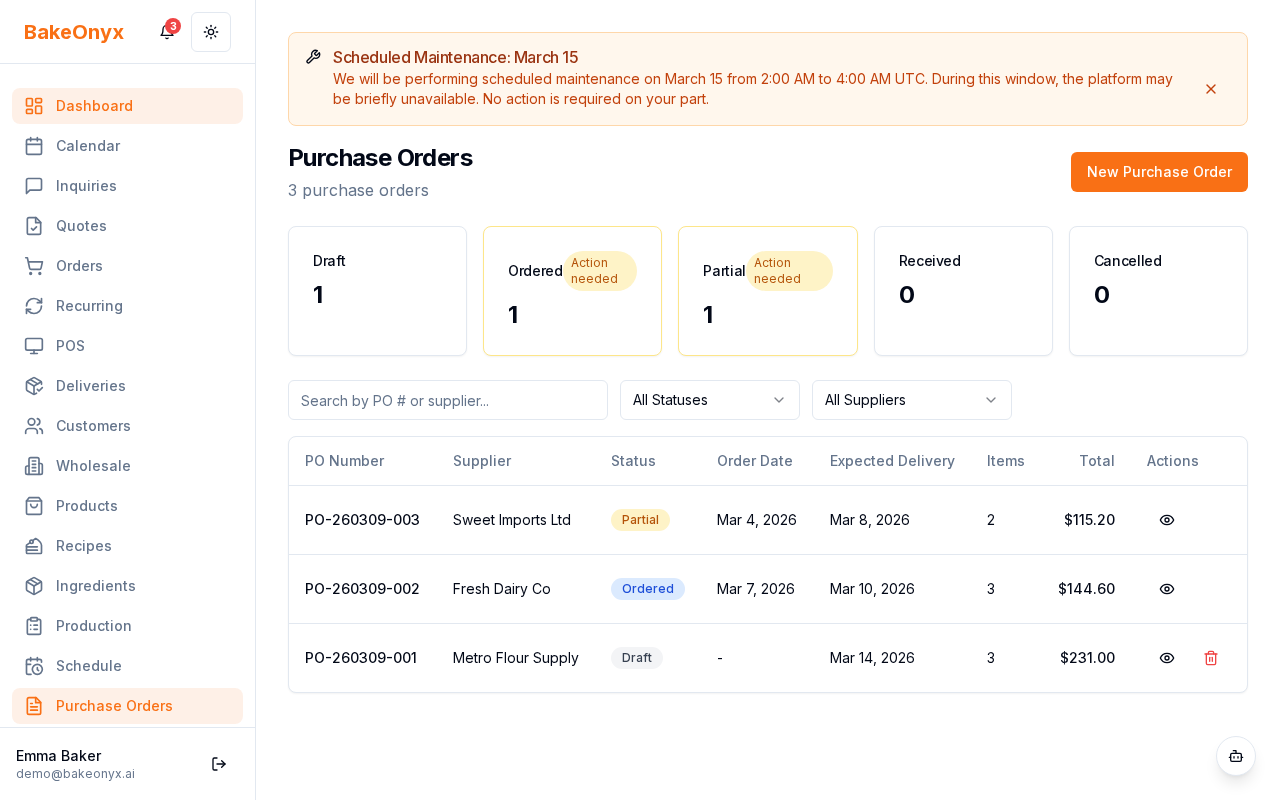
Editing and Managing Your POs
You can edit a PO as long as it's in Draft status. Once sent, you'll need to cancel it and create a new one if you want to make changes. All your POs are listed on the Purchase Orders page, where you can filter by supplier, date, or status.
Next Steps
- Receiving Purchase Orders — Learn how to mark items as received and update your inventory
- Adding and Managing Ingredients — Set up your ingredient list for use in purchase orders
- Creating a New Order — Create customer orders from your available inventory
The summary, FAQ, and statistics in this section were compiled from public sources and reviewed by the BakeOnyx editorial team. AI-assisted research.
Frequently Asked Questions
What information is automatically included when I select a supplier for a purchase order in BakeOnyx?▾
When you select a supplier in BakeOnyx for a purchase order, the system automatically populates crucial details from the supplier's profile. This includes their name, contact information, agreed-upon payment terms (like Net 30), and the typical lead time for deliveries. This feature saves time and ensures accuracy by reducing manual data entry.
How does BakeOnyx help me manage line items on a purchase order?▾
BakeOnyx allows you to add multiple line items for ingredients and supplies on your purchase orders. For each item, you specify the ingredient name, the quantity needed, the unit of measurement (e.g., lbs, cases), and the cost per unit. BakeOnyx automatically calculates the total cost for each line item, streamlining your ordering process.
Can I copy items from a previous purchase order in BakeOnyx?▾
Yes, BakeOnyx offers a time-saving feature for recurring orders. If you frequently order the same ingredients, you can easily copy line items from a recent purchase order to a new one. This significantly speeds up the process of creating repeat orders and minimizes the chance of errors.
What is the format for automatically generated purchase order numbers in BakeOnyx?▾
Purchase orders created in BakeOnyx are assigned a unique identifier automatically. The standard format for these PO numbers is PO-YYMMDD-NNN, where YY represents the last two digits of the year, MM is the two-digit month, DD is the two-digit day, and NNN is a sequential three-digit number. For example, a PO created on January 15, 2025, might be PO-250115-001.
Is creating purchase orders available on all BakeOnyx plans?▾
No, the purchase order functionality is a feature exclusive to the Professional+ tier of BakeOnyx. If you do not see the Purchase Orders menu option within your BakeOnyx account, it indicates that your current subscription plan does not include this feature. You may need to upgrade your plan or contact BakeOnyx support for assistance.