Managing Products and Categories
Create products from recipes, set prices, manage categories, and list items for your storefront and POS.
Managing Products and Categories
- Create products from recipes or add resale items to your bakery catalog
- Organize products into categories for your online store and POS system
- Set prices, manage variants, and control which items appear on your storefront
Understanding Products vs. Recipes
Before you start, it's helpful to know the difference:

- Recipes define how you make something — they include ingredients, quantities, instructions, and automatically calculate your cost.
- Products define what you sell — they have a name, price, image, category, and appear on your storefront and POS.
One recipe can back multiple products. For example, your "Chocolate Cake" recipe can power both a "6-inch Chocolate Cake" and an "8-inch Chocolate Cake" product, each with its own price and variants.
You can also add resale products — items you buy and resell without a recipe, like bottled drinks or packaged cookies.
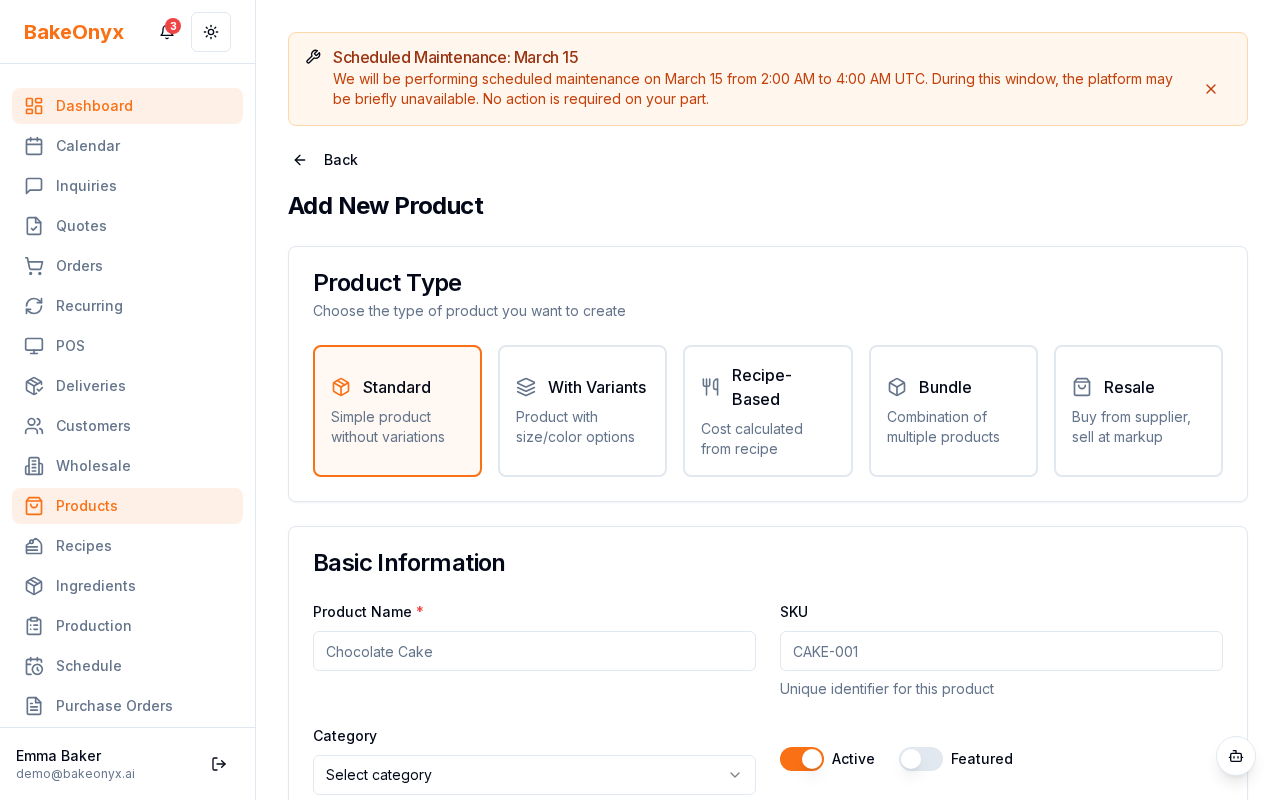
Creating a New Product
- Go to /dashboard/products in BakeOnyx.
- Click the + New Product button.
- Fill in the product details:
- Product Name — What customers see (e.g., "Strawberry Shortcake").
- Description — A brief description for your storefront (optional but recommended).
- Category — Choose or create a category (Cakes, Cupcakes, Bread, Pastries, etc.).
- Base Price — Your selling price. This is what customers pay.
- Recipe — Link to a recipe if this product is baked in-house (optional). Leave blank for resale items.
- Product Image — Upload a photo of your finished product.
- Set the product status to Active so it appears on your storefront and POS.
- Click Save Product.
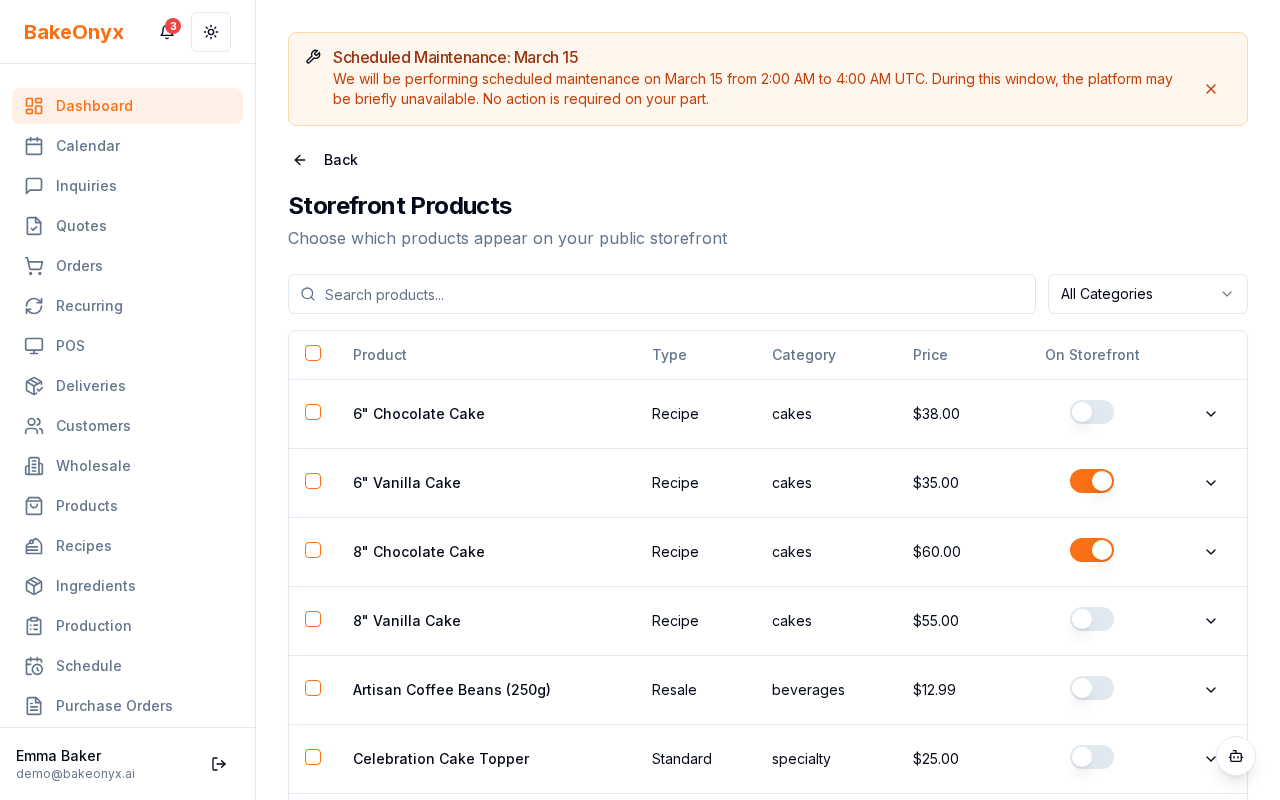
Setting Up Product Categories
Categories help customers find items on your online store and make reporting easier for you.
- In the Products section, look for the Categories tab or link.
- Click + New Category.
- Enter a category name (e.g., "Wedding Cakes", "Seasonal Items", "Vegan Options").
- Add a description if you'd like (this can appear on your storefront).
- Click Save Category.
- When creating or editing products, assign them to the relevant category.
Managing Product Variants
Variants let you offer the same product in different sizes, flavors, or styles — each with its own price.
- Open an existing product or create a new one.
- Scroll to the Variants section.
- Click + Add Variant.
- Enter the variant details:
- Variant Name — e.g., "6-inch", "Chocolate", "Gluten-Free".
- Price — The selling price for this specific variant.
- Click Save Variant.
- Repeat for each size, flavor, or option you offer.
Pricing Your Products
BakeOnyx helps you price products based on your ingredient costs:
- If a product is linked to a recipe, the system shows your ingredient cost automatically.
- Enter your desired base price (what customers pay).
- BakeOnyx calculates your profit margin — the difference between cost and price.
- For resale products without a recipe, simply enter the price you paid and your desired selling price.
Publishing Products to Your Storefront
Products only appear on your online store, POS, and order forms when their status is set to Active. To hide a product temporarily:
- Open the product.
- Set the status to Inactive.
- Click Save.
The product will no longer appear on your storefront or POS, but you can reactivate it anytime.
Next Steps
- Adding and Managing Ingredients — Learn how to set up ingredients and costs for your recipes.
- Creating a New Order — See how customers select products during checkout.
- Using Bake Buddy (AI Assistant) — Get help writing product descriptions and managing your catalog.
Default Tax Rate
Each product can have a default tax rate configured in the Tax section of the product form. When this product is added to an order, the tax rate auto-fills — no manual selection needed each time.
This is especially useful for:
- Products that are always tax-exempt (e.g., a box of 6+ cookies in Canada)
- Products that always have a specific rate (e.g., catering platters at full VAT in the UK)
- Reducing errors on orders with many items at different rates
If no default tax rate is set, the product uses the bakery's default tax rate from Settings → Orders.
The summary, FAQ, and statistics in this section were compiled from public sources and reviewed by the BakeOnyx editorial team. AI-assisted research.
Frequently Asked Questions
What's the difference between a recipe and a product in BakeOnyx?▾
In BakeOnyx, a 'recipe' details how to make an item, including ingredients, quantities, and instructions, and automatically calculates its cost. A 'product' is what you sell, featuring a name, price, image, and category, and appears on your storefront and POS. One recipe can support multiple products, like different sizes of the same cake.
How do I add a new product to my BakeOnyx catalog?▾
To add a new product in BakeOnyx, navigate to the '/dashboard/products' section and click '+ New Product'. Fill in the product name, description, select or create a category, set the base price, link a recipe if applicable (or leave blank for resale items), and upload a product image. Ensure the status is set to 'Active' before saving.
Can I sell items that aren't made from a recipe using BakeOnyx?▾
Yes, BakeOnyx supports 'resale products.' These are items you purchase and resell without needing a recipe, such as bottled beverages or pre-packaged snacks. When creating these items, simply leave the recipe field blank and fill in the other product details like name, price, and category.
How do product categories help my bakery business with BakeOnyx?▾
Product categories in BakeOnyx organize your offerings, making it easier for customers to browse your online store and for you to manage reporting. You can create custom categories like 'Cakes,' 'Pastries,' or 'Seasonal Specials.' Assigning products to categories improves navigation on your storefront and streamlines POS checkout and order forms.
What are product variants in BakeOnyx, and how do I set them up?▾
Product variants in BakeOnyx allow you to offer variations of a single product, such as different sizes or flavors, each with its own price. To set them up, open an existing product or create a new one, then go to the 'Variants' section. Click '+ Add Variant' and enter details like the variant name (e.g., '6-inch', 'Chocolate') and its specific price.
Does BakeOnyx automatically update product costs if ingredient prices change?▾
Yes, when you link a recipe to a product in BakeOnyx, the platform automatically calculates your ingredient cost. If the prices of your ingredients change, BakeOnyx will update the product's cost accordingly. This eliminates the need for manual recalculations, ensuring your pricing remains accurate and profitable.