Invoice Customization
Customize your invoice footer, payment terms, logo size, and privacy policy link.
Invoice Customization
What you'll learn
- How to add footer text to your invoices (like bank details or payment instructions)
- How to set default payment terms and customize your invoice header
- How to add a privacy policy link and adjust your logo size on invoices
Access Invoice Settings
To customize how your invoices look and what information they display, start by navigating to your invoice settings.
- Log in to BakeOnyx and go to Settings from the main menu
- Click Invoice Customization (or look for the invoice icon in the settings sidebar)
- You'll see the invoice settings page with all customizable fields ready to edit
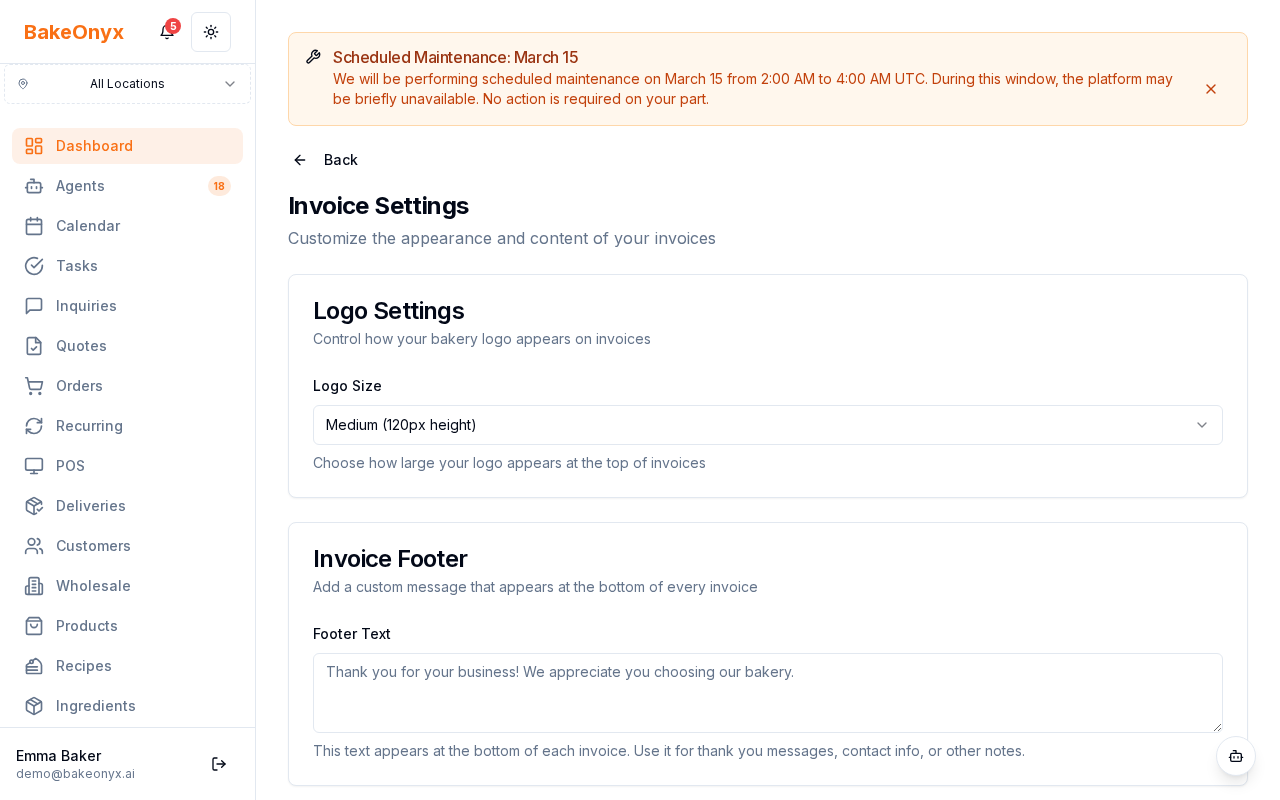
Add Invoice Footer Text
Your invoice footer appears at the bottom of every invoice PDF you send to customers. This is the perfect place for bank details, payment instructions, or a thank-you message.
- Find the Invoice Footer text field
- Click in the field and type your footer content
- You can include multiple lines — press Enter to create line breaks
- Common examples include:
- Bank account details and routing information
- "Thank you for your order!"
- Payment method instructions (e.g., "Checks payable to [Your Bakery Name]")
- Your business phone number or website
- Click Save Changes when you're done
Set Default Payment Terms
Payment terms tell your customers when payment is due. You can set a default that appears on all invoices.
- Locate the Default Payment Terms field
- Enter your standard payment terms (examples: "Due upon receipt", "Net 30", "Due within 14 days")
- This text will automatically appear on every new invoice you create
- Click Save Changes
Customize Your Logo and Header
Control how your bakery logo appears on invoices by adjusting its display size.
- Find the Logo Display Size option
- Choose from Small, Medium, or Large
- Preview how your logo will look at each size
- Select the size that best matches your branding and fits well with your invoice layout
- Click Save Changes
Add a Privacy Policy Link (Optional)
If you want to include a link to your privacy policy on digital invoices, you can add it here.
- Find the Privacy Policy URL field
- Paste the full URL to your privacy policy (example:
https://yourbakery.com/privacy) - Leave this field blank if you don't want a privacy link on your invoices
- Click Save Changes
Set Invoice Number Format (Advanced)
You can also customize how your invoice numbers are formatted and add a prefix.
- Look for Invoice Number Prefix and Invoice Number Format fields
- Enter a prefix if desired (example: "INV-" so invoices are numbered INV-001, INV-002, etc.)
- Adjust the format settings to match your preferences
- Click Save Changes
When Changes Take Effect
All customization changes are applied immediately to new invoices you create. Existing invoices are not affected. This means you can safely update your footer text, payment terms, or logo size without worrying about changing past customer records.
If you need to control which specific sections appear on your invoices (like hiding the due date or customer notes), visit Document Display Settings instead.
Next steps
- Email Settings — Set up how invoices are sent to customers
- Welcome to BakeOnyx — Get started with core platform features
- Understanding Subscription Plans — Learn about your BakeOnyx account
The summary, FAQ, and statistics in this section were compiled from public sources and reviewed by the BakeOnyx editorial team. AI-assisted research.
Frequently Asked Questions
How do I add my bakery's bank details to invoices?▾
To add your bank details to invoices, navigate to Settings > Invoice Customization within BakeOnyx. Locate the 'Invoice Footer' text field. Here, you can type in your bank account and routing information, along with any other essential payment instructions. Remember to click 'Save Changes' to apply these details to all future invoices.
What are default payment terms and how do I set them in BakeOnyx?▾
Default payment terms inform customers when payment is due. In BakeOnyx, go to Settings > Invoice Customization and find the 'Default Payment Terms' field. Enter your standard terms, such as 'Due upon receipt' or 'Net 15'. This setting will automatically populate on new invoices, saving you time. You can always adjust terms for specific orders.
Can I change the size of my bakery logo on invoices?▾
Yes, BakeOnyx enables you to customize your logo's appearance on invoices. Within the Invoice Customization settings, find the 'Logo Display Size' option. You can select from 'Small', 'Medium', or 'Large' to ensure your logo fits perfectly with your invoice layout and branding. Preview the options before saving your choice.
How can I add a link to my privacy policy on invoices?▾
To include a privacy policy link on digital invoices, access the Invoice Customization settings in BakeOnyx. Find the 'Privacy Policy URL' field and paste the complete web address of your privacy policy page. If you prefer not to display a link, simply leave this field empty. Ensure you save your changes.
How do I customize invoice numbering in BakeOnyx?▾
BakeOnyx offers options to customize invoice numbering. In the Invoice Customization settings, you can set an 'Invoice Number Prefix' (e.g., 'INV-') to appear before the sequential number. You can also define the 'Invoice Number Format' to control the numbering sequence, ensuring a professional and organized approach to your billing.