Inventory Transfers Between Locations
Transfer ingredients between bakery locations with tracking and automatic stock updates.
Inventory Transfers Between Locations
- How to request and track ingredient transfers between your bakery locations
- How stock is automatically updated when transfers are completed
- Best practices for managing multi-location inventory
If you manage multiple bakery locations, BakeOnyx lets you transfer ingredients between them while keeping accurate stock records. This feature is available on the Enterprise tier and helps you balance inventory across locations without manual spreadsheets.
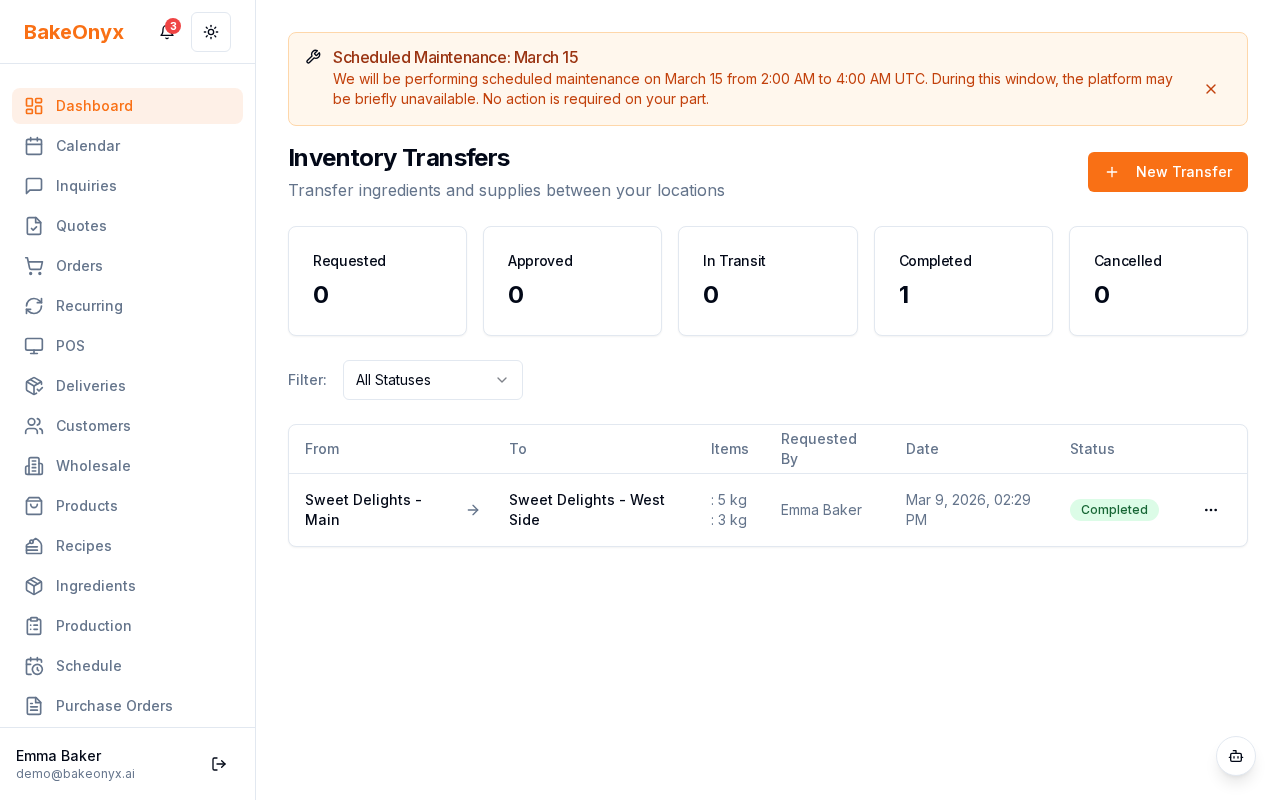
Accessing Inventory Transfers
- Log in to your BakeOnyx dashboard
- Navigate to Inventory in the main menu
- Click Transfers
You'll see the Inventory Transfers page, which displays all transfer requests across your locations.
Creating a New Transfer
- Click the New Transfer button (usually in the top-right corner)
- Select the From Location — this is where the ingredients are currently stored
- Select the To Location — this is where you want the ingredients to go
- Click Add Item to begin adding ingredients
- Search for and select an ingredient from your inventory
- Enter the Quantity you want to transfer
- Repeat steps 4–6 for each ingredient you need to move
- Review your transfer details and click Submit
Understanding Transfer Status
Once you submit a transfer, it moves through a status workflow:
- Requested — The transfer has been created and is waiting to be picked up or acknowledged by the destination location
- In Transit — The ingredients are on their way to the destination location
- Completed — The transfer has been received and confirmed. Stock is automatically deducted from the source location and added to the destination location
- Cancelled — The transfer was cancelled and no stock changes were made
Tracking and Updating Transfers
- On the Transfers page, find the transfer you want to update
- Click on the transfer row to open its details
- Change the status using the Status dropdown:
- Move from Requested to In Transit when the package leaves
- Move to Completed when the destination location receives and verifies the items
- Click Save to confirm the status change
Viewing Transfer History
All transfers — completed, cancelled, and in-progress — are stored in your transfer history. You can:
- Filter transfers by status, location, or date range
- See who requested each transfer (tracked by user)
- View a detailed list of items included in each transfer
- Export transfer records for accounting or auditing purposes
Best Practices
- Communicate with your team: Let staff at both locations know when a transfer is in progress so they can prepare for receiving or packing
- Schedule transfers strategically: Plan transfers during slower periods to avoid disrupting daily operations
- Verify quantities: Always confirm that received items match the transfer request before marking it complete
- Review regularly: Check your transfer history monthly to spot patterns in ingredient movement and optimize stock allocation
Next Steps
- Business Profile Settings — Manage your location details and information
- Staff Scheduling and Shift Management — Coordinate your team across locations
- Using the Calendar — Plan production schedules and transfers
The summary, FAQ, and statistics in this section were compiled from public sources and reviewed by the BakeOnyx editorial team. AI-assisted research.
Frequently Asked Questions
How do I initiate an ingredient transfer between my bakery locations using BakeOnyx?▾
To initiate a transfer, log in to your BakeOnyx dashboard, navigate to 'Inventory,' then 'Transfers.' Click 'New Transfer,' select the 'From Location' and 'To Location,' and then click 'Add Item.' Search for the ingredient, enter the quantity, and repeat for all items before clicking 'Submit.'
When do stock levels actually update after a transfer is made in BakeOnyx?▾
Stock levels are only automatically updated when a transfer is marked as 'Completed' within BakeOnyx. Until then, the ingredients remain in the source location's inventory. Moving a transfer to 'In Transit' or 'Completed' status requires manual action by the user.
What are the different statuses for inventory transfers in BakeOnyx?▾
BakeOnyx uses four statuses for inventory transfers: 'Requested' (waiting for pickup/acknowledgment), 'In Transit' (ingredients are en route), 'Completed' (received and confirmed, stock updated), and 'Cancelled' (no stock changes made).
Can I transfer more ingredients than I have in stock at a location?▾
BakeOnyx will warn you if you attempt to transfer more ingredients than are currently available at the 'From Location.' While the system provides a warning, it's best practice to double-check your available stock before submitting the transfer request to ensure accuracy.
What happens if I accidentally mark a transfer as 'Completed' too early?▾
Marking a transfer as 'Completed' in BakeOnyx makes the stock changes permanent and automatic. It's crucial to ensure the receiving location has physically verified the ingredients before confirming completion. There is no undo function for completed transfers.